TERRACOTTA
TILE ROOF RESTORATION

Melbourne’s highest quality Terracotta tile roof restoration.

REQUEST YOUR

FREE INSPECTION

YOU'LL BE PLEASANTLY SURPRISED
WITH OUR PRICES

ABOUT TERRACOTTA TILE ROOF RESTORATION

Terra cotta tiled roofs are a popular selection in Melbourne. There durability and permanent colouring make them ideal for home construction. The tiles themselves will generally last for up to 100 years and undergo little or no fading throughout their lifespan.


Like all roofs, however, periodic maintenance is required. Valleys can rust and roof flashings, like the surrounds of a chimney or the pipes in your roof, can fail and require replacement. The mortar that sits under the longer edge caps (known as ridge caps) frequently cracks and becomes dislodged. This concrete is designed to secure the ridge caps in place. When it fails the ridge caps can blow off in high winds.


Unglazed or semi-glazed (two-tone) terracotta tiles are also prone to lichen growth. While low to moderate lichen growth does little damage, it can be unsightly. Heavy lichen growth can impede the effective discharge of rainwater from your roof and cause leaks. Because lichen imperfectly covers the tiles, it can cause them to heat irregularly. This creates stresses within the tiles that can increase the amount of breakages that occur on older tiles on hot days. We recommend having the lichen removed from your roof when you elect to have it repaired.


Lichen is a symbiotic plant that requires algae to survive. Algae is attracted to the excess moisture and dirt that builds up on an unglazed terracotta tile surface. The lichen then forms over the algae and assists it by holding extra moisture in its body keeping the algae alive. The algae in turn provides the lichen with a grounding system and additional nutrients. After the lichen and algae have been removed, the best way to impede its regrowth is to apply a glaze to the tiles. This prevents the unglazed areas from absorbing excess water and assists in dirt pickup prevention. As a side benefit, it also restores the original gloss level to the tiles and improves heat reflectivity

GET YOUR OBLIGATION FREE QUOTE FROM MELBOURNE'S TERRACOTTA ROOF TILE RESTORATION SPECIALISTS

Below you will see our step by step guide on how to successfully restore a terracotta tiled roof.

STEP ONE: SAFETY RAILS

All work on roofs require physical edge protection to be erected by law. Falls from roofs are amongst the most common workplace injury. If our tradespeople don’t feel safe, they also find it difficult to provide you with the high quality we demand. Prior to commencement of any of our roofing projects, full perimeter rail is erected around the roofline.

STEP TWO: BROKEN TILES

Most older roofs have a significant percentage of tiles that have minor chips and damage. The vast majority of these will never pose an issue and not be visible from a distance. Some tiles, however, may have breaks large enough that water ingress might occur. The first step after the rails are up is to thoroughly assess the roof and locate and replace any broken tiles that might be likely to leak.

STEP THREE: ROOF PENETRATIONS

Roofs generally have numerous pipes coming through them that are either sewerage vents or heat flus. The older style lead flashing on these can often split and fail. These are all carefully checked and any faulty ones are replaced with a new style Dektite flashing kit (seen below). The rubber sleeve prevents moisture from running down the pipe into the home and the flexible acrylic mat base is far more resilient than the old-style lead bases that were used.

STEP FOUR: CHIMNEY FLASHINGS

Chimneys are a very common water ingress point. This is because they are a large roof penetration that rely on multiple metal or lead flashing components to prevent water from entering. These flashing components can often fail. They are made up of a rear gutter called a soaker tray, steel plating on the sides called hanging or step flashing, and lead trim around the sides and front. All of these components are thoroughly examined for defects. In the cases of older homes, we generally recommend having all components replaced.

STEP FIVE: VALLEY IRONS

Valleys in roofs are the metal gutters that exist between opposing roof slopes. They convey water from the internal intersection of the faces down to the guttering. As they are a collection point for dirt and debris, they often begin to fail after 20 years or so. With all full roof restorations on homes over 20 years, we always fully replace all valleys in Colorbond steel. Valley tiles were traditionally secured to the valley using a concrete mix. The steel expands and contracts over time which can result in the concrete bedding working loose. Rust also develops much quicker under the concrete. Therma-

Guard Roof Restoration utilises a special adhesive foam rubber compound that binds and seals the valleys to the tiles much more effectively.

STEP SIX: FUNGICIDE TREATMENT

Prior to cleaning, the algae and lichen on the tiles must be neutralised. Cleaning the roof without killing the spores will result in very rapid regrowth, sometimes as soon as a few months. We utilise an industrial-strength chlorine and water solution that is evenly applied across the roof and left to sit for at least two hours. The chlorine effectively kills the fungi as well as the spores ensuring regrowth is significantly delayed. The bleaching qualities of this chemical also assist in removing stains on the tiles that occur due to long-term lichen growth.

STEP SEVEN: PRESSURE CLEANING

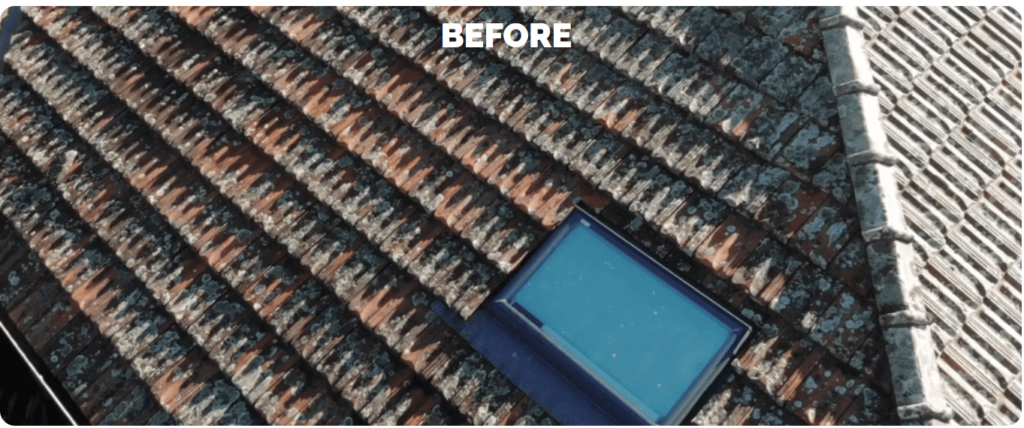
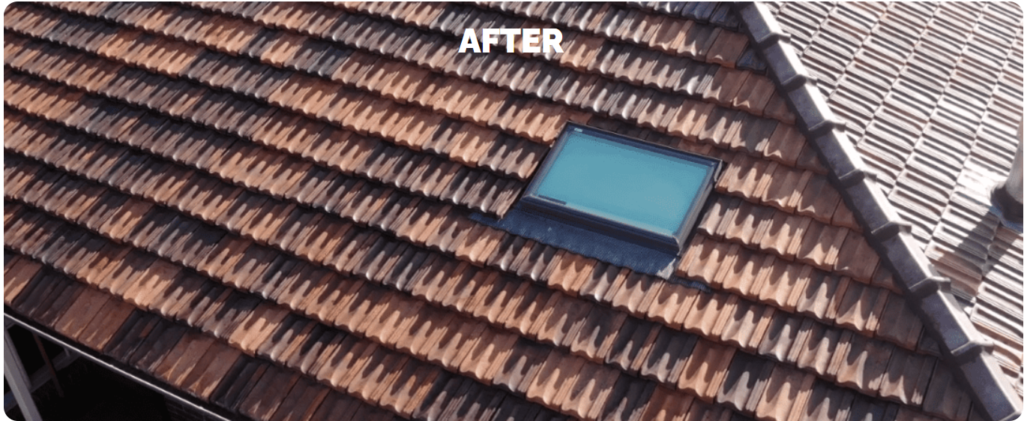
Lichen growth, particularly if left for many years, creates unsightly stains on a tile that can remain even after pressure cleaning. For this reason, it is imperative that an industrial-strength pressure cleaner is utilised to remove the lichen and as much of the staining as possible. Our cleaners can generate a staggering 4,500 pounds of pressure per square inch. That’s around six times as much as a domestic cleaner could produce. This pressure, in combination with the bleaching qualities of the chlorine solution, will remove all but the 

most stubborn of stains. Anything left is unlikely to be visible from the ground. Such is the pressure applied that faulty tiles with hidden cracks will often break under our cleaners. These tiles are also replaced. 

STEP EIGHT: CLEAR PROTECTIVE GLAZE

The final stage of the lichen prevention process is the application of our tile glaze. Therma-Guard Roof Restorations terracotta tile glaze is a protective compound that is designed to increase the life of your roof, minimise the frequency of future repairs, greatly impede the regrowth of algae and lichen and significantly improve the visual appearance of your terracotta tiles. It is an advanced membrane that incorporates a clear pure acrylic with UV stabilisers, added polyvinyl acetates for increased adhesion, and

silicone for increased strength. Additional fungicides are also present in its liquid form. These are there to ensure any stubborn spores left from the pressure clean are killed also. The fungicides evaporate away as the coating dries. Our glazing system has a mid to high gloss level that will bring your roof back to a brand new appearance. The UV reflective qualities and gloss level also assist in infrared reflectivity which will significantly reduce the tile temperature which in turn will also help to keep your home cooler. Two separate applications are applied for additional protection. The membrane is completely waterproof so it will protect both the tiles themselves as well as the bedding mortar and roof flashings. All of our tile coatings are safe to collect drinking water.

Our approach to roof restoration is designed in bringing the best that technology has to offer in terms of appearance and quality and combining that with advanced heat protective science. The end result is a fantastic looking roof that will endure for decades, look as good as a new roof-and perform better!

BOOK YOUR FREE ROOF INSPECTION

High quality roof restorations with our unique 4-coat heat reflective technology